
Quick-links:
Quick-links:
Sometimes you just run out of pins to control your LEDs.
There are lots of options open to you, not limited to:
This tutorial hopes to show you another option; Hang 2 LEDs from each I/O pin of your uC. It's effectively the very simplest form of charlieplexing.
An LED will light if the voltage differential across it is greater than the Forward Voltage (usually labelled VF in the LED's documentation). Because it's a diode, it will only light when it's connected one way...
This circuit will not light the LED.
WARNING: Do not use this circuit.

Circuit Diagram 1.1
The LED will not light because the cathode of the LED is more positive than the anode; the diode is reversed. The warning about not using this circuit is because if Vcc is greater than the reverse breakdown voltage of the LED (see its datasheet), you may damage the LED.
Assuming that the supply voltage (Vcc) is greater than the LED's VF then the following circuit will light the LED. Very brightly. For a short while.
WARNING: Do not use this circuit.

Circuit Diagram 1.2
"Why not use this circuit?"
Because it's likely that the LED will burn out rather quickly.
LEDs do not, usually, limit the current that flows through them. It'll attempt to carry all the current that the supply will give. If the supply is really weedy, like a button cell, then you'll get away with it because most button cells can only supply a few milliamps. If the supply is more beefy, like a 10A bench power supply, then the LED won't last more than a brief flash [...you have burned so very, very, brightly, Roy...] . If it's something in between, like a couple of AA batteries, then the LED might last anything between a few seconds and a few years. You might get lucky.
To prevent the LEDs burning out, a current limiting resistor is needed. This is just a normal resistor that is used to limit the current that flows though the LED. For the moment, I'm going to skip the calculation of the value needed and where to place it; it'll be covered later (see section 5). All you need to know is that a current limiting resistor will probably be needed somewhere. If you do decide to live life on the edge and use an LED without a current limiting resistor, then you'll be tutted at by many electronics professionals. They might even leave you off their christmas card list.
In the following examples, the following assumptions are made:
These assumptions are to simplify the circuits down to their bare-bones. The reasoning for these assumptions is as follows;
This first circuit will not light either of the LEDs.
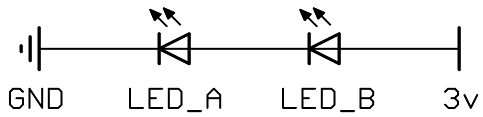
Circuit Diagram 2.1
"Why not? It's exactly the same as Circuit 1.2, there's just an extra LED in series."
The reason is because each LED needs to drop 1.9v. 2 lots of 1.9v is more than the 3v supply, hence the LEDs don't light.
Note: There is not actually a single threshold voltage at which an LED will suddenly light. A few microamps will flow at considerably below the normal lit forward voltage, and if viewed in low lighting conditions may be seen to glow. Some LEDs have quite a sharp curve where they start to let current flow. Others, noticeably modern 'high efficiency' or similarly named LEDs, have a very long curve and may glow well below their stated VF. The amount of glow acceptable will depend upon the application. You'll need to read the LED's datasheets carefully and empirically test the LEDs. For the moment, however, we're going to continue with the assumption that the LEDs don't light at all in this circuit.
"So why have your just shown me a circuit that doesn't work?"
Because we can be connect a pin of a friendly uC in-between these two LEDs and do something exciting.
"What will that do?"
Well, it depends on how that pin is configured...
In this case, neither LED will light. On AVRs, an input pin is 'high impedance', meaning it lets no current flow through the pin. That means that we can pretend that the pin isn't there and the circuit behaves as per diagram 2.1.
Note: AVRs can have pull-up resistors on input pins. These can be thought of as a 30-50k resistor between the pin and Vcc. This can be ignored in this application as the tiny current flowing through this is unlikely to cause the LED to glow. If it does, the pull-ups can be turned off for that pin.
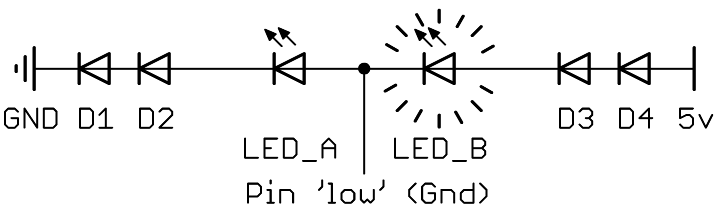
In this case, the circuit can be considered to be as follows:
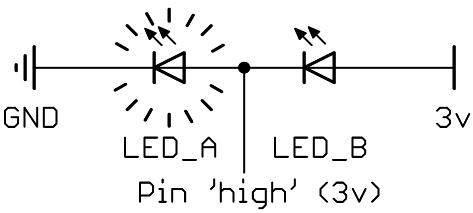
Circuit Diagram 2.2
Which means that LED_A lights up. LED_B is not lit, as the voltage differential across it is zero, i.e. both sides of LED_B are at 3v.
In this case, the circuit is equivalent to the following:
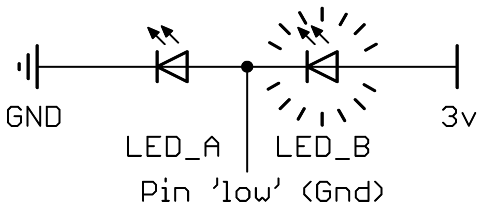
Circuit Diagram 2.3
Which means that LED_B lights up. LED_A is not lit, as the voltage differential across it is zero, i.e. both sides of LED_A are at Gnd.
| Pin state | Hi-Z (input) | 0v (ouptut, low) | 3v (output, high) |
|---|---|---|---|
| LED_A | off | off | on |
| LED_B | off | on | off |
Table 2.1 : Pin/LED states
"What's that Hi-Z business? Where's that come from?"
It's just some terminology used in TriState logic that most uC's i/o pins employ. As usual, wikipedia is the lazy-article-writer's friend. When using AVRs, it essentially it means that the pin is set as an input.
"Whoa! Hang on! What if we want both LEDs on?"
Those of you still awake may have noticed that none of the states in table 2.1 have both LED_A and LED_B lit at the same time?! So what do you do if your nuclear reactor console needs to show that BOTH cores are going critical?
It can't be done.
No, seriously; it can't be done.
You can't light both LEDs at the same time with this circuit
But... we can cheat...
If you switch between lighting LED_A and LED_B very fast, then they'll both look as if they're on. This might sound really nasty, but trust me, it works well. It's the sort of thing that microcontrollers are really good at.
e.g.
	{
	start:
		set pin 1 to HIGH ;
		set pin 1 to LOW ;
		// now do it over and over again
		goto start ;
	}
I'll walk through some more useful (and hopefully more elegant) code to do this later on...
"But all my circuits run off 5 volts. What happens if I use this with a 5v supply?"
Oh good question. Good timing. That's exactly what I'm covering next...
If Circuit 2.1 is used with a 5v supply, both LEDs will light up. That's because VCC/2 (2.5v) is more than the 1.9v VF that our standard red LEDs need to light.
Simply use LEDs with higher VF values. There are some lovely blue and white LEDs with VF values placed sensibly between 2.5v and 5v. They'd work very nicely.
But what if you don't want blue LEDs?
This time we'll still use the 'standard' red LEDs that have the 1.9 VF.
Somehow we want to reduce the 5v supply to something more 'low VF LED friendly'. We can use the fact that semiconductors drop voltage. What about using some diodes? Not the light-emitting kind this time.
A normal silicon diode will drop about 0.6v across it (again, I'm skipping merrily over some details here - further details are given in section 6.). Given that we want to drop about 2v from the supply, we can use four of them as follows.

Circuit Diagram 3.1
In this circuit, (remember that Vcc is 5v) neither LED_A nor LED_B light. That's because each diode (D1-4) drops 0.6v. This means that the remaining voltage differential seen across XY is only 5v - (4 * 0.6v) = 2.6v. This 2.6v across both LED_A and LED_B is not enough to light them.
So, how does this circuit behave if we connect a uC pin in between LED_A and LED_B...
As before, when the pin is set to be an input, it has no effect, hence the circuit is equivalent to circuit 3.1 and neither LED is lit.
The uC pin is set as an output with a high state (e.g. 5v). In this case, the circuit is equivalent to the following:
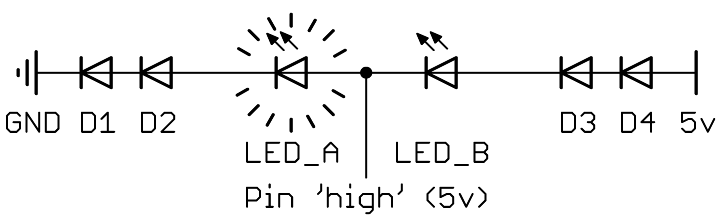
Circuit Diagram 3.2
As you can see, LED_A is lit. That's because the voltage across is is 5v less the drops across D1 and D2. That's 5v - (2 * 0.6v) = 3.8v. LED_B is not lit as there's no voltage across it, i.e. both sides are at 5v.
In this case, the circuit is equivalent to the following:
Circuit Diagram 3.3
In this case, LED_B is lit. Similar to the previous case, it has 3.8v across it (this time diodes D3 and D4 drop the voltage). LED_A is not lit as there is no voltage across it; both sides are at Gnd.
I'll cover these points later.
For the moment, let's muddy the waters even more...
Just gaining one extra LED on a single pin isn't too exciting. Whilst we're probably not aiming for whole building illumination, we might want to scale this up somewhat. Let's aim for 8 pins controlling 16 LEDs...
"Do I really have to duplicate those 4 diodes for each pair of LEDs?"
"That's 32 diodes!"
Well, it turns out that you can share D1-4 for all of the LEDs...
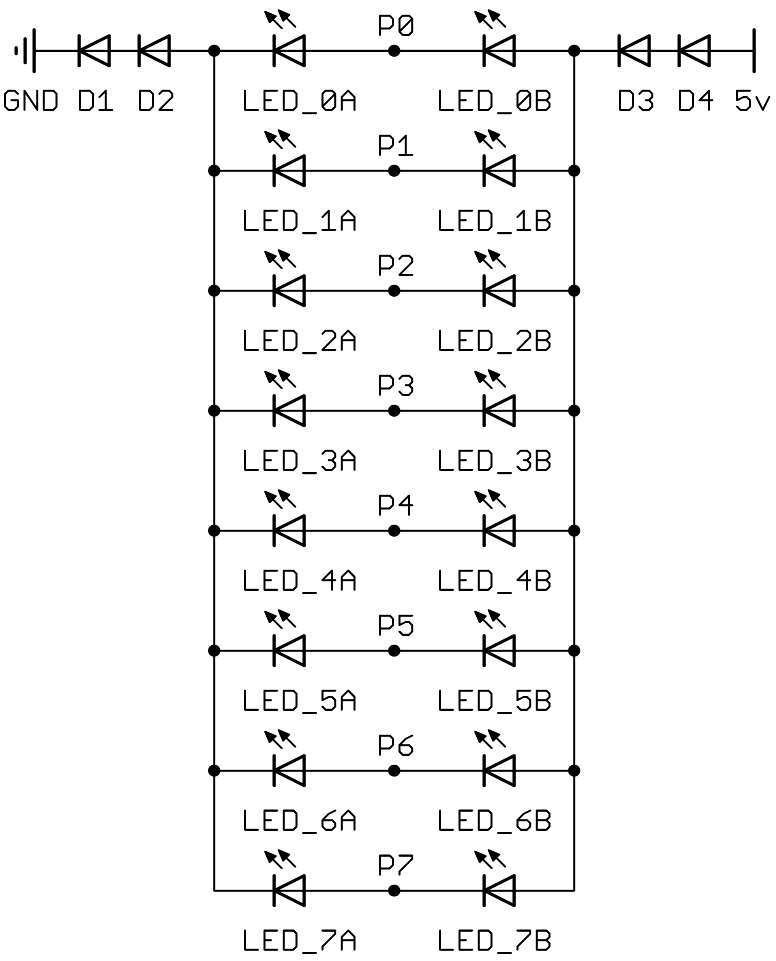
Circuit Diagram 4.1
This circuit shares D1-4 with all the LEDs. (P0-7 are where the 8 uC pins are connected)
Each pin controls two LEDs, using the same logic as in previous sections. If the pin's an input, both its LEDs are off. If it's an output, then one of the two LEDs will be lit.
If you're starting to worry about how you're going to write code to control all those LEDs, don't. I'll give you some nice shiny code later on.
OK, as promised, I'm finally here. Here are some back-of-fag-packet-calculations for you:
To calculate the resistor that each LED needs, we need to know:
Note: The "supply voltage to the LED" used in these calculations is VCC less 2 diode drops, because we're calculating the resistor required when the pin is controlling the LEDs. See Circuit Diagrams 3.2 and 3.3.
Vdrop is 0.6v
VCC is 5v
Vsup is VCC - (2 * Vdrop) = 3.8v
ILED is 20mA (most LEDs' datasheets say that this is a reasonable current).
VF is 1.9v
Vres is Vsupply - VF = 1.9v
Simple application of V=IR gives:
R = Vres/ILED = 95 ohms
"So where do I stick the resistor(s)?"
The resistor needs to sit between the centre of the two LEDs and the pin that controls them.

Circuit Diagram 5.1
Normally it's not good practice to share a current limiting resistor between two LEDs, but in this case it's OK because we know that only one LED of the pair will ever be lit at one time.
Until now, I've just assumed that diodes will drop 0.6v, no matter what. In reality, the voltage dropped by a diode will depend upon the current flowing through it. Different types of diode will drop different amounts. In general, the more current flowing through a diode, the greater the voltage dropped.
To determine what sort of voltage drop we can expect, we'll therefore need to know what sort of current we're expecting;
Most normal LEDs can take 20mA. We will be lighting between 0 and 8 LEDs, hence the total current we can expect will be 0 to 160mA.
With that in mind, let's look at a few different diodes to see what the typical variation in voltage drop they give across this range of currents; (weasly caveat: don't use these figures anywhere as they're likely to be plain wrong.)
BAS16:(SOT23, high-speed switching diode)
BAV99:(SOT23, high-speed switching diode - dual package)
1N4148:(leaded signal diode)
1N4001:(leaded rectifier diode)
| 0.5mA | 20mA | 60mA | 100mA | 160mA | |
|---|---|---|---|---|---|
| BAS16 | 0.45v | 0.80v | 0.88v | 0.96 | 1.05v |
| BAV99 | 0.45v | 0.75v | 0.88v | 0.95 | 1.10v |
| 1N4148 | 0.58v | 0.80v | 0.88v | 0.92 | 1.05v |
| 1N4001 | 0.6v | 0.65v | 0.68v | 0.70 | 0.82v |
Table 5.1: voltage drop at various currents
Note: I've used a current of 0.5mA in the table, as obviously figures aren't available for 0mA.
This information brings a couple of problems to the fore:
When reasonable currents are flowing (e.g. one LED is lit), the voltage drop over the diodes is larger than previously expected, hence the voltage across our current limiting resistor(s) will be lower, hence the current through the LED will be lower than calculated. e.g. we'll get less than the targetted 20mA. As more LEDs are turned on, a greater drop in voltage will be encountered, meaning that even less current will flow through each LED
e.g. When only one LED is on, it will be less bright than expected. When 8 LEDs are on they will be even dimmer still.
Will that matter?
Calculating the actual current expected (and hence voltage drop etc.) is tricky, because;
In other words, they are interrelated.
I think that I'm supposed to summon Mr Newton or Mr Raphson to help with balancing all the equations here, but that would need two things;
Instead, I'm going to do some simple iterative calculations to verify that my choice of resistor and diodes are reasonable.
I'm going to be using BAS16 diodes and 68 ohm resistors.
Note: this resistor is much lower than the 95ohms calculated in section 5, but I have the benfit of hindsight - 68 ohms is actually a more useful value
When one LED is on, I'm assuming roughly 20mA as a start-point.
At 20mA, the BAS16 will drop 0.74v. That leads to a voltage of 5v-(2*0.74v)-1.9v = 1.62v across 68ohms which = 23.8mA
At 23.8mA, the BAS 16 will drop abount 0.75v. That leads to a voltage of 5v-(2*0.75v)-1.8v = 1.6v across 68ohms which = 23.5mA.
Further iterations will get the result to somewhere between these two figures. Let's say 23.7mA.
When 8 LEDs are on, I'll assume 160mA
At 160mA, the BAS16 will drop 0.95v. That leads to a voltage of 5v-(2*0.95)-1.9v = 1.2v across 68ohms which = 17.6mA per LED, or 141mA
At 141mA, the BAS16 will drop 0.94v. That leads to a voltage of 5v-(2*0.94)-1.9v = 1.22v across 68ohms which = 17.9mA per LED, or 143mA
Further iterations will, again, get the result to somewhere between these two figures.
This means that one LED will run at 23.8mA, and that 8 LEDs will run at 17.8mA each. That seems reasonable. I know that my LEDs are OK up to 30mA.
At very low currents, the voltage dropped by the diodes tails off markedly.
"Why is that a problem?"
If the voltage-droped from the diodes is too little, then the voltage across an LED pair may actually be enough to light them (even if it's with a very low current). In practice, this may only be a problem for high-efficiency LEDs, since they have a long tail at the bottom of their "Forward Current vs Forward Voltage" graphs. This means that at voltages well below their stated VF, they will still let some current through, and thus light the LED dimly.
Four diodes may not be enough to prevent a pair of high-efficiency LEDs from glowing.
Actually calculating wether LEDs will or won't work with this technique is tricky if you're just working from datasheets. They don't tend to give detail at the lower end of the "Forward Current vs Forward Voltage" graphs [I suspect that the standard-deviation down at these areas of the graph is quite wide, and that for most applications of the LEDs, the detail would be irrelevant]. It's a lot easier to just hook up a pair of LEDs and a few diodes and see if they glow.
If the LEDs still glow with 4 diodes, try 6!
When selecting diodes, you're going to have to consider the power they can handle...
I originally wanted to use the BAV99 diodes (a pair of diodes in a single SOT-23 package), but it turns out this might not be a good idea... Here's why;
At 160mA, each diode in a BAV99 will drop 1.1v.
Power = IV, so the power being dissipated will be 1.1v * 160mA = 176mW per diode.
That's 352mW in the dual-diode package. That's too close to the datasheet's maximums, so I've had to opt for the BAS16s instead...
A BAS16 will drop 1.05v at 160mA, leading to 168mW being dissipated. My BAS16 datasheet says it's good for 350mW, so I should be OK.
All the following code assumes the following:
Obviously, ports and timings can be changed to suit.
Firstly, here's a very simple example; just turn on LED_0A:
// turn on LED 0A... this is attached to PIN0 of port D
// that's done by setting the pin as output and high
PORTD = 0b00000001 ;
DDRD = 0b00000001 ;
Result: LED_0A is on. All other LEDs are off.
The counterpart is to just turn on LED_0B:
// turn on LED 0B... this is attached to PIN0 of port D
// that's done by setting the pin as output and low
PORTD = 0b00000000 ;
DDRD = 0b00000001 ;
Result: LED_0B is on. All other LEDs are off.
Repeatedly swapping between the two examples above (with a small delay between) can be accomplished as follows;
// turn on both LED 0A and 0B by flickering between the two
while(1)
{
	// turn on 0A
	PORTD = 0b00000001 ;
	DDRD = 0b00000001 ;
	_delay_ms(1);

	// turn on 0B
	PORTD = 0b00000000 ;
	DDRD = 0b00000001 ;
	_delay_ms(1);
}
Result: The illusion that both LED_0A and LED_0B are on].
The above examples aren't really very useful. If you need to be in this loop to flicker the LEDs, then your microcontroller isn't going to be doing anything else. There are much better things it could be doing (controlling nuclear reactor cores, for example).
A more elegant solution here is to use a regularly timed interrupt to switch between showing all the A LEDs and all the B LEDs. A helper function pre-calculates the settings required and stores them in a global variable for the interrupt to use.
The main loop of the program then no longer needs to be involved with flickering the LEDs, it just calls the helper function whenever it wants to show a different pattern on the LEDs. The interrupt quietly gets on with flickering LEDs in the background.
The following code uses this interrupt + helper method to demonstrate a simple 16 LED chaser.
/*
Copyright (c) 2008, Nigel Batten.
Contactable at <firstname>.<lastname>@mail.com

Redistribution and use in source and binary forms, with or without
modification, are permitted provided that the following conditions are met:

	1.	Redistributions of source code must retain the above copyright
		notice, this list of conditions and the following disclaimer.
	2.	Redistributions in binary form must reproduce the above copyright
		notice, this list of conditions and the following disclaimer in the
		documentation and/or other materials provided with the distribution.

THIS SOFTWARE IS PROVIDED ``AS IS'' AND ANY EXPRESS OR IMPLIED WARRANTIES,
INCLUDING, BUT NOT LIMITED TO, THE IMPLIED WARRANTIES OF MERCHANTABILITY AND
FITNESS FOR A PARTICULAR PURPOSE ARE DISCLAIMED. IN NO EVENT SHALL THE
COPYRIGHT HOLDER BE LIABLE FOR ANY DIRECT, INDIRECT, INCIDENTAL, SPECIAL,
EXEMPLARY, OR CONSEQUENTIAL DAMAGES (INCLUDING, BUT NOT LIMITED TO, PROCUREMENT
OF SUBSTITUTE GOODS OR SERVICES; LOSS OF USE, DATA, OR PROFITS; OR BUSINESS
INTERRUPTION) HOWEVER CAUSED AND ON ANY THEORY OF LIABILITY, WHETHER IN
CONTRACT, STRICT LIABILITY, OR TORT (INCLUDING NEGLIGENCE OR OTHERWISE) ARISING
IN ANY WAY OUT OF THE USE OF THIS SOFTWARE, EVEN IF ADVISED OF THE POSSIBILITY
OF SUCH DAMAGE.

===============================================================================
A demonstration of controlling 16 LEDs from 8 pins.
Nigel Batten
September 2008

Written for a 'factory setting' Mega8 (highbyte: 0xd9, lowbyte:  0xe1)
e.g. running on 1Mhz internal RC oscillator.

(Don't forget that your programmer may need to be on it's "slow" setting)

requires the following:
A timer with an overflow interrupt

*/

#include <avr/io.h>
#include <avr/interrupt.h>
#include <util/delay.h>

// define the processor speed if it's not been defined at the compiler's command line.
#ifndef F_CPU
#define F_CPU 1000000
#endif

// global variables to hold the input/output state required for each set of LEDs; A and B
volatile uint8_t g_Slice_A_DDRD ;
volatile uint8_t g_Slice_B_DDRD ;

// procedure headers
static void inline led_init( void ) ;
static void led_encode( uint16_t leds );

int main (void)
{
uint16_t leds = 0; // 16 bits. One per LED.

	/*
	// turn on LED 0A... this is attached to PIN0 of port D
	// that's done by setting the pin as output and high
	PORTD = 0b00000001 ;
	DDRD  = 0b00000001 ;
	while(1);
	*/

	/*
	// turn on LED 0B... this is attached to PIN0 of port D
	// that's done by setting the pin as output and low
	PORTD = 0b00000000 ;
	DDRD  = 0b00000001 ;
	while(1);
	*/

	/*
	// turn on both LED 0A and 0B by flickering between the two
	while(1)
	{
		// turn on 0A
		PORTD = 0b00000001 ;
		DDRD  = 0b00000001 ;
		_delay_ms(1);

		// turn on 0B
		PORTD = 0b00000000 ;
		DDRD  = 0b00000001 ;
		_delay_ms(1);
	}
	*/


	// initialise the LEDs...
	led_init();
	led_encode( leds ) ;

	// start the interrupts running...
	sei();

	// now a (really simple) demonstration...
	// sweep a lit LED through each position.
    while(1)
    {
		_delay_ms( 500 ) ;
		if (leds == 0)
		{
			leds = 0b1 ;// start the sweep from the start.
		}
		else
		{
			leds <<= 1 ; // shift the lit LED up one position.
		}
		led_encode( leds ) ; // change this to ~leds if you want to invert the display.
	}
    return(0);
}

// set up the timer
void led_init( void )
{
	// set Timer0's prescaler to 8. It will then overflow every 256 * 8 CPU cycles.
	// That's 488 times per second with a 1Mhz clock.
	TCCR0 = ((0<<CS02)|(1<<CS01)|(0<<CS00)) ; // use clock prescaler of 8 for timer0
	TIMSK |= (1 << TOIE0) ; // turn on the overflow interrupt for timer0
}

// encode the 16-bit value representing which LEDs are lit into the port settings required.
// These port settings will be used by the interrupt handler to toggle between the two banks of LEDs.
void led_encode( uint16_t leds )
{
uint8_t ddr_A = 0 ;
uint8_t ddr_B = 0 ;

	uint16_t ledbitpos = 0b1 ;
	uint8_t pinbitpos = 0b1 ;
	while ( ledbitpos != 0 )
	{
		if (leds & ledbitpos) ddr_A |= pinbitpos ;
		ledbitpos <<= 1 ;
		if (leds & ledbitpos) ddr_B |= pinbitpos ;
		ledbitpos <<= 1 ;
		pinbitpos <<= 1 ;
	}
	g_Slice_A_DDRD = ddr_A ;
	g_Slice_B_DDRD = ddr_B ;
}

// timer 0 overflow handler
ISR( TIMER0_OVF_vect )
{
static uint8_t s_slice = 0 ;

	// toggle the slice counter determine wether to show the A or B leds...
	s_slice ^= 0xff ;
	if (s_slice)
	{	// light any A LEDs required...
		DDRD = g_Slice_A_DDRD ;
		PORTD = g_Slice_A_DDRD ; // A's are lit when the pin is 1
	}
	else
	{	// light any B LEDs required...
		PORTD = 0b00000000 ; // B's are lit when the pin is 0
		DDRD = g_Slice_B_DDRD ;
	}
}